Friday, October 28, 2011

How To: Remove the Bolt from a Lee Enfield Rifle

This is a quick, to the point video I made on how to remove the bolt from your Lee Enfield Rifle.


As you can see, I used two different variants of the Lee Enfield. The bolts remove the same way.

Rifles:

1. 1964 dated Ishapore made No. 1 Mk 3 Lee Enfield chambered in .303 British

2. 1926 dated Lithgow made SMLE Lee Enfield chambered in .303 British

Things to remember about your Lee Enfield:

1. Make sure it is unloaded first, as always. The magazine release is right in front of the trigger, so be aware of the rules of gun safety.

2. You should be able to hear the parts click back into place. The video camera actually did a great job picking up the sound. Make sure you hear that sound and you'll know everything is in place.

3. Carefully decock your Enfield before putting it away. Enfields should not be stored cocked.

4. The bolt on the Lee Enfield is spring loaded. As you can see, the Ishapore's bolt spring still works. The Lithgow's does not. If your spring does not work, you can have it replaced by a good gunsmith, but it isn't necessary for good function of the rifle.

5. Do you own a Lithgow? Does it have paint on it, especially around the nose cap? Do some research. You may have been told it was for importing, it wasn't. The paint, if present even in trace amounts, should be green, yellow, or red. Green means good to go, yellow means 2nd level but still alright, and red was deemed not to be fired. A lot of the red ones made their way here. Check with a gunsmith if you are unsure. Any older weapon should visit a good gunsmith to be checked for safety.

Saturday, October 15, 2011

How to Take Down and Reassemble a Smith & Wesson M&P Handgun


  1. Drop magazine, make sure it is unloaded.
  2. Lock back slide.
  3. Push down take down lever.
  4. Push down yellow lever inside gun.
  5. Release slide and pull off.
  6. Reverse to reassemble.
Watch the video for better instructions. :)

Saturday, August 20, 2011

How to Use the Sights on Old Rifles

My YouTube

Late Edit:

Someone left a comment on this video at YouTube that I thought was worth adding in addition to the video.

I have seen at least one milsurp variant whose rear sight does flip up for elevation adjustment - the Steyr M95.
When laying down it looks pretty conventional and is set for 500 Schritten (a schritten is 0.75 meters). For shooting at longer ranges the sight leaf is hinged at the rear and the slider may be adjusted from 700-2200 schritten, or you can use another notch at the top of the leaf for 2400 schritten - just shy of 2000 yards and more than a bit optimistic.
JESSERL

Thursday, August 11, 2011

Why and When Should I Clean my Gun?

This is a question I hear often. Why should I clean my gun, and when should I clean it?

Everyone on the internet has a different opinion, and opinions vary by gun maker and style. One of the most common things I hear is that the AK47 type rifles and the GLOCK handguns don't need to be cleaned. I'm not sure how this got started, but it is complete hog wash.

There is no gun that never needs to be cleaned. It doesn't exist. And as I always say, if you aren't willing to care for a firearm, don't buy one. If you take care of it, it will take care of you. But if you neglect it, it won't work when you need it to.

So, here's the rules of thumb:

Why should I clean my gun? Simple. Like anything else, they get dirty. And if they get too dirty, it hinders function. And they do get dirty even if you don't shoot it much. A night stand only gun will still collect dust and have lubrication that dries up.

Cleaning a gun is a great way to learn how the gun works and keep an eye on it. Even "Tactical Tupperware" has metal parts, so you need to inspect for rust and pitting. "A gun only has two enemies... rust and politicians." CLP won't keep the politicians off your gun, but it will help keep the rust off. Rust eats away at metal, it doesn't just make it look ugly. If the rust gets bad enough, the gun may suffer broken parts and general issues.

Your gun also needs to be correctly lubricated to keep it functioning properly. You will always have metal rubbing on metal, and if the parts aren't lubricated correctly, that metal rubbing on metal will begin to shave pieces off. After a while you could run into an issue where your gun isn't as tight as it should be (which will drastically effect accuracy) or it will lock up completely and just stop working. There isn't much you can do at this point for a gun in that condition. Companies generally won't replace or repair frames (serialized parts). So your only option is to buy new. A bottle of good lubricant runs about $5.95. A new gun can run upwards of $500. Your choice.

When should I clean my gun? Most people clean their guns after shooting them. Some guns on the market are a little more forgiving if you forget to clean after every range session (ex: my GLOCKs tend to be alright if I forget, where my Beretta will have a hairy fit). But for best results, clean after shooting. It elongates the life of your gun and helps to ensure proper function in a moment of need.

If your gun tends to sit in a drawer and you don't shoot it much, you still need to clean it. I generally tell people that every four months is a good bet. Four months is about when any rust protectant you use will begin to lose effectiveness. Moisture in the air will rust your guns, and stainless steel will still pit. Plastic and stainless steel is not an excuse to not clean. They all need regular maintenance. Aside from that, dust is everywhere, and it will hinder function. So you need to clean off the dust. And, of course, lubricants can and will dry out.

In a future post, I will begin talking about how to clean your guns. It's not horrible, trust me. Some of us folks more into it may get a little nuts with the cotton swabs, but you can give your gun a good cleaning pretty fast. Stand by!
 

Thursday, July 28, 2011

Take Down: GLOCK Handguns

I always tell people... if you've seen a GLOCK, you've seen them all!

I happen to be a fan of the GLOCK family of firearms, and am a GLOCK certified armorer (this means I was, in fact, trained by GLOCK; check out GLOCK's website if you'd like to get certified yourself). What I'm showing you here isn't rocket science, though, and doesn't take any certification.

As you can tell, I'm starting you out slow and easy. The Sig and the GLOCK are some of the easiest take downs you'll come across, which is something great to consider when buying a home defense gun.

The video below is the easiest way to do it. This isn't like the Sig video. I own two GLOCK handguns, so I did the video in voice. Please ask if you don't understand, I'll do my best to assist. You can ask here or on YouTube, the choice is yours.

I'm new at this whole gun video thing, so I am still getting a hang of doing this with a camera on a tripod between me and the guns, so please be a little forgiving when watching this one. LOL!

Hope you find it helpful!


Gun info:

GLOCK 26 - 9MM "baby GLOCK" This one is outfitted with a frame lock that actually takes a key. Yes, it was factory installed by GLOCK, no I've never actually used it. The 26 can take the magazines for the 19, 17, 34, and 18 (33 rd mag). I put on no slip grip and slide decals to make holding it a little better.

GLOCK 21 SF - 45 ACP, SF stands for "slim frame." It was one of the tester guns released onto the market before they came out with Generation 4. Mine has the 1913 (picatiny) rail and ambi mag release. I also installed the extended slide stop for match shooting.

Saturday, July 23, 2011

Take Down: Sig Sauer

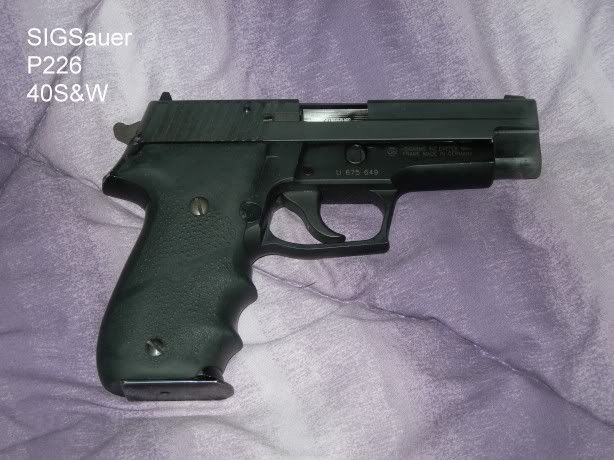
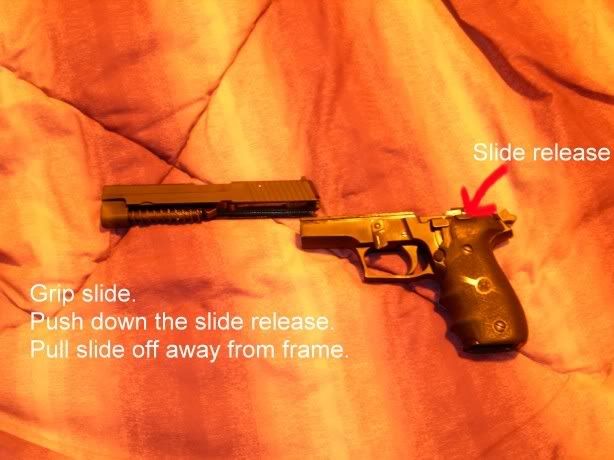
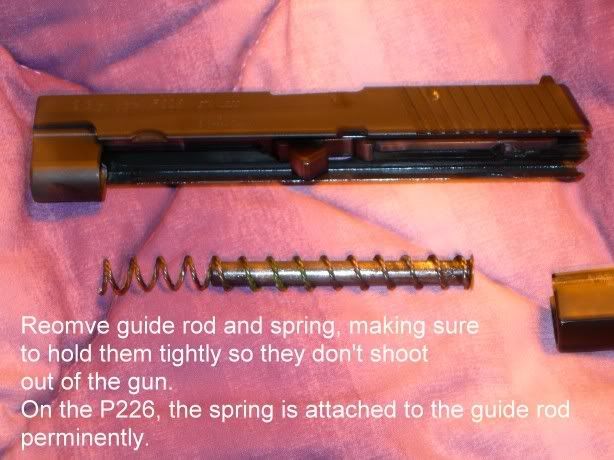
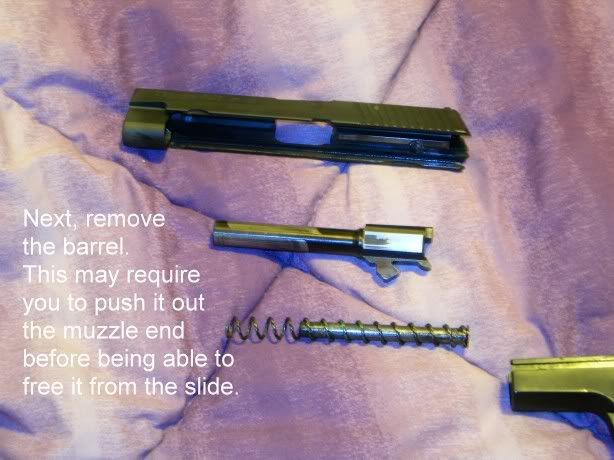
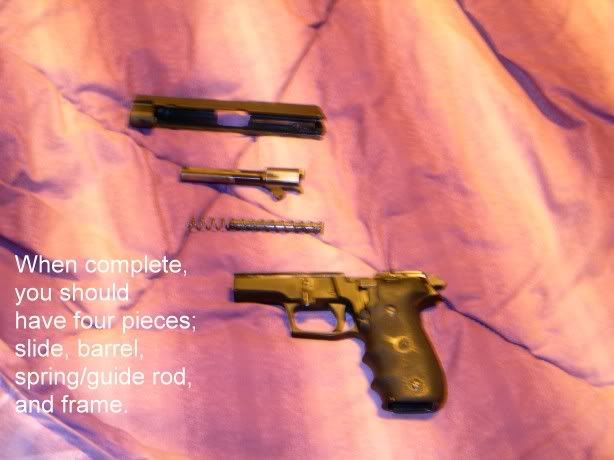
This is a photographic tutorial of how to take down a Sig Sauer pistol with a classic frame. The gun used for this was a Sig Sauer P226 in 40SW.

Please free to comment with any questions. I sold this particular gun a while back, so it is no longer in my possession and I no longer own any Sigs, but I can do my best to give advice. This tutorial was done some time ago, picture quality isn't very good, but I'll try my best to explain what is going on.

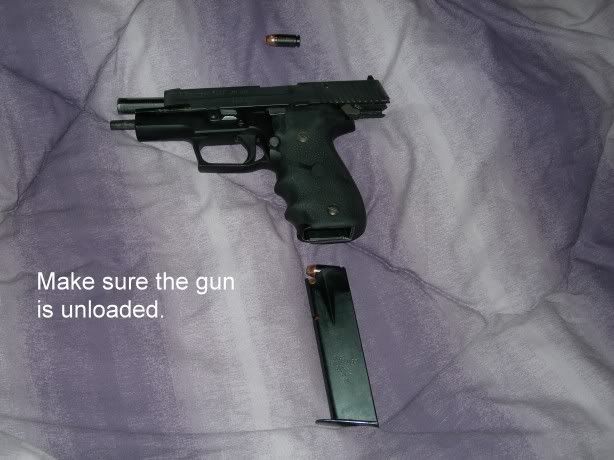
Always make sure the gun is unloaded before you attempt to take it down. This is basic gun safety, and helps to prevent unwanted discharges. 
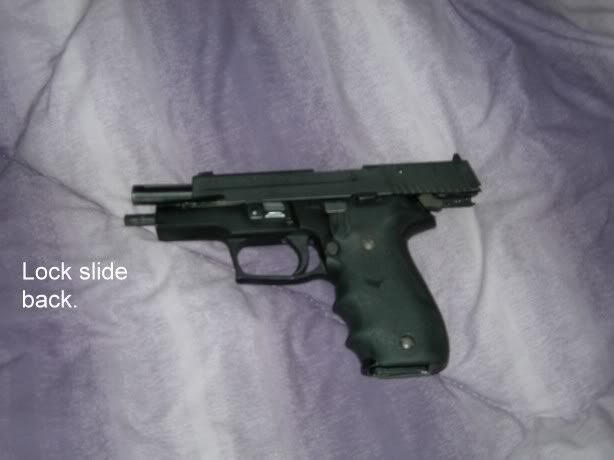
Remove the magazine. Lock slide back. You will have to manually lock the slide back by pushing the slide as far back as it will go easily and pushing the slide release up. While holding the slide release in place, release the slide itself and it should stay open.

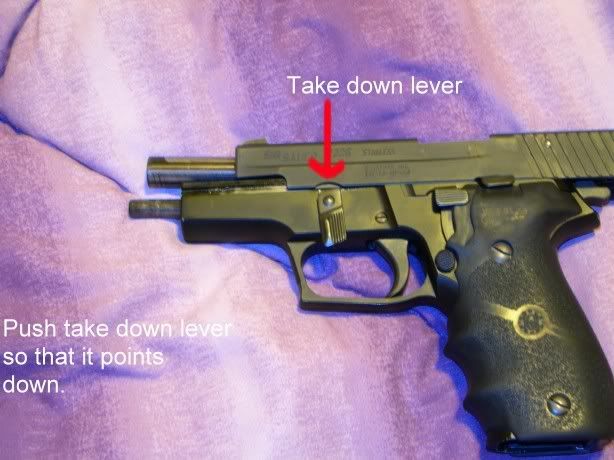
 You'll notice a notch cut in the slide. This is to make moving the take down lever easier. It should be lined up above the take down lever, as pictured. Moved the take down lever so that it points down.


Make sure to grab hold of the slide at this point. While holding the slide, push down the slide release and pull the slide forward and off the frame. 

Put the frame down and hold the slide. First, remove the guide rod and spring by giving it a little pressure to release it from the barrel. Pull them out. The guide rod and spring are under tension, so make sure to get a good grip so you don't launch them. On this particular gun, the spring does not come off the guide rod.
Now you're going to remove the barrel. Do this by pushing it slightly forward until it sticks out of the front of the slide a little bit, then lift the barrel and remove it from the slide. 
Dis-assembly is now complete.  You should have four pieces in front of you, the slide, the barrel, the guide rod/spring, and the frame. Unless you are a gun smith, I do not recommend taking it down any further. Please be aware that taking it down further may void your warranty with Sig Sauer. 

Things to be aware of when taking down a Sig:
As you probably know, the grips on the Sig are removable and replacement grips are available. The Sig above is pictured with a set of after market grips, rubber wrap around grips made by Hogue. Please be very careful when removing the grips and replacing them. Under the grip is a very small, thin spring, what I used to refer to as a pig's tail. It looks like a paper clip someone straightened and then made a curl with. This spring can be easily broken. So if you decide to remove the grips for any reason, be very careful of how you handle that spring.

Re-Assembling a Sig Sauer:

I don't have photos to go along with it, but the easy explanation is to reverse what you did to take it apart. Here are the steps:

  1. Put down the frame and pick up the slide. 
  2. The barrel will go in similar to how you removed it. Make sure the flat side is facing into the slide. Push the muzzle through the slide a small bit until the barrel drops in, then slide it back to line up correctly with the slide.
  3. Pick up the spring and guide rod. If your spring happens to be detached from the guide rod, slide it onto the guide rod. Now, line the end with more spring exposed with the opening below the barrel. Carefully push the guide rod into the spring, depressing the spring, until it lines up with the bottom of the barrel. There should be a place cut into the bottom of the barrel by the breech for the guide rod end to fit into. Push the guide rod into position, making sure it does not come out between the spring. Keep in mind the pressure of the spring and keep a good hold on the set up until you are certain the guide rod is in the correct position.
  4. Line the slide up on the slots in the frame. Carefully push the slide down those slots. If it takes a whole lot of pressure, STOP and remove the slide to try again. Remember that you should not have to put too much force on anything... too much force means you are not doing it correctly. 
  5. Push the slide all the way back and lock the slide open.
  6. Push the take down lever up so that it lays flush against the frame. 
  7. Once the take down lever is flush with the frame and everything looks good, go ahead and release the slide. Keep hold of it until you are sure it is together correctly and functioning properly.
  8. Test the slide to make sure it moves correctly and everything is together as it should be.
  9. Your gun is now re-assembled and ready to use.

Massad Ayoob - What to Say After

IMO Mags Player - What to do/say after a real life self defense shooting